Lab 01 - Python Setup
This lab is all about making sure your computer is set up and ready for you to start coding.
Introduction
Note: This lab is pretty long and there is a good chance you won't complete it all in class. You should work through the parts you don't complete on your own to make sure you are all set up and ready for the rest of the course.
This lab explains how to use your own computer to complete assignments for CS 111 and introduces some of the basics of Python.
If you need any help at any time through the lab, please feel free to come to office hours or post on the course Discord.
This lab looks really long, but it's mostly setup and learning how to use the essential tools for this class; these may seem a bit difficult now, but will quickly become second nature as we move further into the course.
Discord Setup
Please add the the course Discord. Here we will use the help queue channel and a voice channel to assist students all semester long. Please feel free to ask questions and help other studetns. Keep in mind that posting code within the public channels and copying others' code is academically dishonest.
Python Setup
The terminal
The terminal is a program that allows you to interact with your computer by entering commands. No matter what operating system you use (Windows, macOS, Linux), the terminal will be an essential tool for CS 111.
macOS/Linux
If you're on a Mac or are using a form of Linux (such as Ubuntu), you
already have a program called Terminal or something similar on your
computer. Open that up and you should be good to go.
Windows
For the purposes of CS 111, you should use Windows PowerShell as your terminal. PowerShell comes pre-installed on Windows and requires no extra setup. You can simply launch it from the Start menu. Most of the Bash commands covered in this course will work in PowerShell; when an alternate command is needed (such as to unzip a compressed folder), the lab instructions will give both the Bash command and the PowerShell command.
If you have difficulties with copy/paste in PowerShell, you can install Windows Terminal from the Microsoft Store using the instructions below.
Optional: Windows Terminal installation instructions
- From the start menu, open the Microsoft Store
- Search "terminal" in the search bar
- Select the "get" button to install
Install Python 3
Python 3 is the primary programming language used in this course. Use the instructions below to install the Python 3 interpreter. (The instructions may feature older versions of Python 3, but the steps are similar.)
Important: If you already have an older version of Python
installed, please make sure to download and install Python 3.9 or later. You can
check your Python version by running the command python ––version in the terminal.
Linux
Open the terminal and run the Python installation command for your Linux distribution. If your distribution isn't listed below, consult the internet to find the proper command.
Ubuntu 20.04+ or Debian 11+
sudo apt install python3 python-is-python3Arch Linux
pacman -S python
macOS
Download the macOS 64-bit installer by selecting the downloadable link under Stable Releases at the page below. https://www.python.org/downloads/macos/
You may need to right-click the download icon and select "Open". After installing, please close and open your Terminal.
Windows
Download the Windows installer (64-bit) by selecting the downloadable link under Stable Releases at the page below. https://www.python.org/downloads/windows/
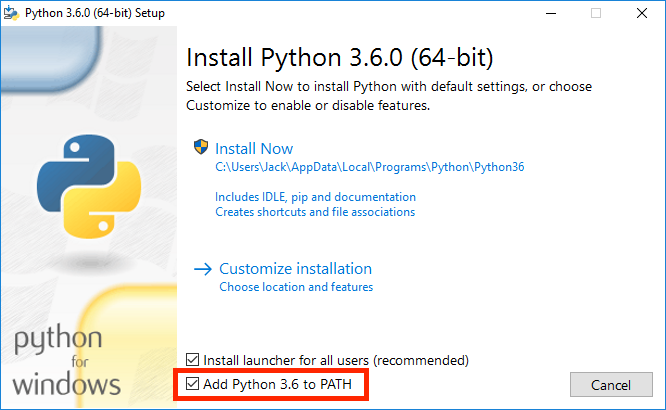
Run the installer and make sure to check the "Add Python 3.x to PATH" box, which will allow you to execute the python command from your terminal.
After installing, please close and open your terminal. Try running the python command. If this doesn't work, try python3 or py. Windows may use any of these to refer to Python, so you should use the one that works on your machine.
Other
Download Python for your operating system from the download page.
Install an IDE (Integrated Development Environment)
The Python interpreter that you just installed allows you to run Python code. You will also need a special text editor called an IDE, where you will write Python code.
There are many IDEs out there, each with its own set of features. Visual Studio Code (VS Code) is a popular choice among the staff for this course, as well as PyCharm.
If you are not already familiar with another editor, VS code has often been recommended, though PyCharm is the easiest to install, especially if on a Mac.
Some other editors that are used among staff are listed below as well.
We highly recommend for this class you use either VS Code or PyCharm.
Should I use VS Code or PyCharm?
VS Code pros:
- Many of the TAs for this course are familiar with VS Code and are equipped to help you troubleshoot
- VS Code is highly extensible and can be used to write code in languages other than Python (eg. HTML, JavaScript, etc.)
PyCharm pros:
- Your section TA may be one of the TAs for this course who prefers PyCharm
- PyCharm is optimized for Python, but the same company also has text editors for C, C++, and Java that you will use in future courses.
What other text editors are out there?
For your reference, here are some written guides to popular editors used by real developers. Some of these editors are designed to be easy to learn and use, such as VS Code, Atom, and PyCharm. Some of them have complex but powerful commands and functionality, such as Vim and Emacs.
(Although we have included this guide, we do not recommend using editors other than VS Code and PyCharm for this class, since TAs are not equipped to help you troubleshoot other text editors.)
- Visual Studio Code: A full-featured desktop editor with many extensions available to support different languages.
- Atom: A more lightweight desktop editor.
- Vim: A command-line editor.
- Emacs: A command-line editor.
- PyCharm: A desktop editor designed for Python.
- Sublime Text: A text editor that works with code.
Warning: Word processors such as Microsoft Word should not be used to edit programs. They are NOT IDEs and word processors can add extra content to documents that will confuse the interpeter. You should never use Microsoft Word or a similar word processor to edit programs for any CS course.
Checkpoint
By this point in the lab, you should have installed a Python interpreter and a text editor. If you had difficulty following any of the steps above, stop here and ask for help before going on.
If your difficulties are caused by your hardware (e.g. you have an iPad or some other device that does not allow you to download software), talk to your TA or a professor about your options so that you do not fall behind in the course while you acquire a suitable device.
If you do not want to invest in a laptop right now (e.g. you are planning on serving a mission and getting a laptop when you return, you are not majoring in CS and you do not need a laptop for your other courses, or you do not have the means to get a laptop this semester), BYU has a laptop rental program for students.
Using the terminal
Let's check if everything was installed properly!
First, open a terminal window. If you're on Windows, launch PowerShell from the Start menu. If you're on macOS or Linux, open the Terminal.
We will be using zsh on Linux, but these commands should work on any of these platforms.
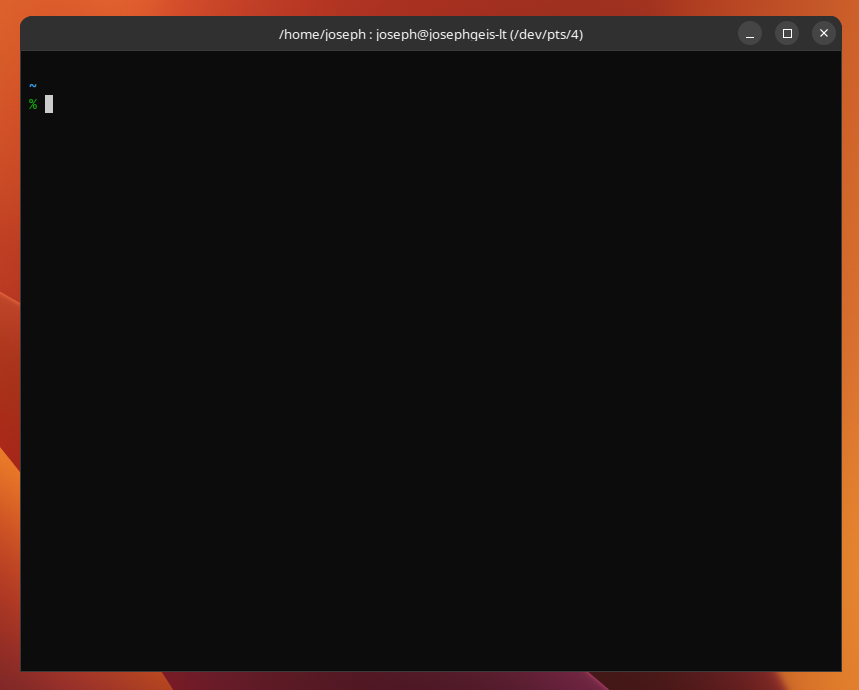
When you first open your terminal, you will start in the "home
directory". The home directory is represented by the ~ symbol,
which you might see at the prompt.
Don't worry if your terminal window doesn't look exactly the same. The important part is that the prompt shows
$(indicating Bash),%(indicating zsh), orPS(PowerShell). If you seeC:\Users\Oski>but noPSbefore it, you're in the Command Prompt! Do not use that! Close it and launch PowerShell instead.
Try running echo "$HOME". Verify that it displays the path to your
home directory.
Python Interpreter
We can use the terminal to check if your Python 3 interpreter was
installed correctly. Try the following command python or use python3.
It might look something like this:
$ pythonIf the installation worked, you should see some text printed out about
the interpreter followed by >>> on its own line.
Python 3.10.9 (main, Dec 19 2022, 17:35:49) [GCC 12.2.0] on linux
Type "help", "copyright", "credits" or "license" for more information.
>>>
This is where you can type in Python code.
Try typing some expressions you saw in lecture, or
just play around to see what happens! You can type exit() or Ctrl-D
to return to your command line.
Important: If the output begins with Python 2.7.18, you either installed the wrong version of Python, or you need to use the python3 command instead.
Windows troubleshooting
- If the
pythoncommand doesn't run at all: Trypython3,py, orpy -3instead.- If you see
WindowsApps/python: Permission denied: Open Settings (or right-click the Desktop & click Personalize), search for "App Execution Aliases" (or find it by clicking Home→Apps→App execution aliases), and disable the entries that say "python". (Screenshots here.) Alternatively, go to theWindowsAppsfolder whose path is shown and just renamepython.exeandpython3.exeto something else, or delete them entirely if you are able to. Then try again.- If Python doesn't run at all: Make sure you set up your "PATH" correctly as shown above.
- If you mixed multiple versions of Python (e.g. 32-bit and 64-bit, or 3.6 and 3.8, etc.): They may conflict. Occasionally, this becomes extremely difficult to fix—even for instructors. Uninstall them one-by-one (the most recent one first), then reinstall only the latest 64-bit version.
- If you manually downloaded Python from its own home page and don't see
64in the file name: You probably got the 32-bit version. It might work. But if it doesn't, uninstall it before trying another method. If you need to manually find the 64-bit version, look for a recent stablex86-64 executable installer.Ask for help if you get stuck!
Navigating the Terminal
To test your code in this class we will be running it using the terminal. This will require you open the correct folder on your computer where your code is stored so that when we use the run commands it can find the right files.
Directories
The first command you'll use is ls. Try typing it in the terminal:
lsThe ls command lists all the files and folders in the current
directory. A directory is another name for a folder (such as the
Documents folder). Since you're in the home directory right now, you
should see the contents of your home directory.
This is how you check if you're in the right location.
If
lsdoesn't work, butdirdoes: stop! You've mistakenly opened the Windows Command Prompt! Exit it, and run PowerShell instead.
Changing directories
Now that we know what's in a folder when you locate the folder you want to open we need to change directories, using the cd command.
Let's try moving into your Desktop directory. First, make sure you're in your home
directory (check for the ~ on your command line). If you are not in
your home directory, type cd ~ to move into the home directory.
Use ls to see if the Desktop directory is present. Try typing the
following command into your terminal, which should move you into
that directory:
cd DesktopOn some Windows accounts, your actual Desktop folder might be inside OneDrive:
cd OneDrive/DesktopIf you still can't find your Desktop directory, ask for help on Discord or in office hours.
There are a few ways to return to the home directory:
cd ..(two dots). The..means "the parent directory". In this case, the parent directory ofDesktopis your home directory, so you can usecd ..to go up one directory.cd ~(the tilde). Remember that~means home directory, so this command will always change to your home directory.cd(cdon its own). Typing justcdis a shortcut for typingcd ~.
You do not have to keep your files on your Desktop if you prefer otherwise. Where you keep your files locally will not affect your grade. Do whatever is easiest and most convenient for you!
Windows PowerShell tip: If you're using PowerShell, you can start it directly by holding Shift, right-clicking inside any folder, and selecting "Open PowerShell Window here". It will automatically
cdto that folder, so you'll have to runcd ~to change to your home directory.
More Commands
Now you should know how to check what content is in the current folder you're at and you should know what to change which folder you are in. These two commands should be sufficient for this course.
ls: lists all files in the current directorycd <path to directory>: change into the specified directory
Later we will discuss how to run your code once you know your terminal is in the right location. Go ahead and create a CS111 folder for this class with the following sub-folders: labs, hw, and projects on your desktop or other preferred place. If you'd like to learn how to do this and more commands with the terminal visit the Terminal 101 page or refer the Making new Directories section below.
Tip: When you open PyCharm, VS code, or another code-editor there is usually a built-in terminal you can open. Opening a terminal this way will open the terminal in your project/assignment folder by default.
Making New Directories
The next command is called mkdir, which makes new
directories. Let's make a directory called cs111 on your Desktop
(or some other directory) to store all of the assignments for this class.
First, make sure you are in the Desktop directory, then type this into
the terminal:
mkdir cs111A folder named cs111 will appear on your Desktop. You can verify this
by using the ls command again or by simply checking your Desktop.
At this point, create some more directories. First, we will move to the ~/Desktop/cs111 directory.
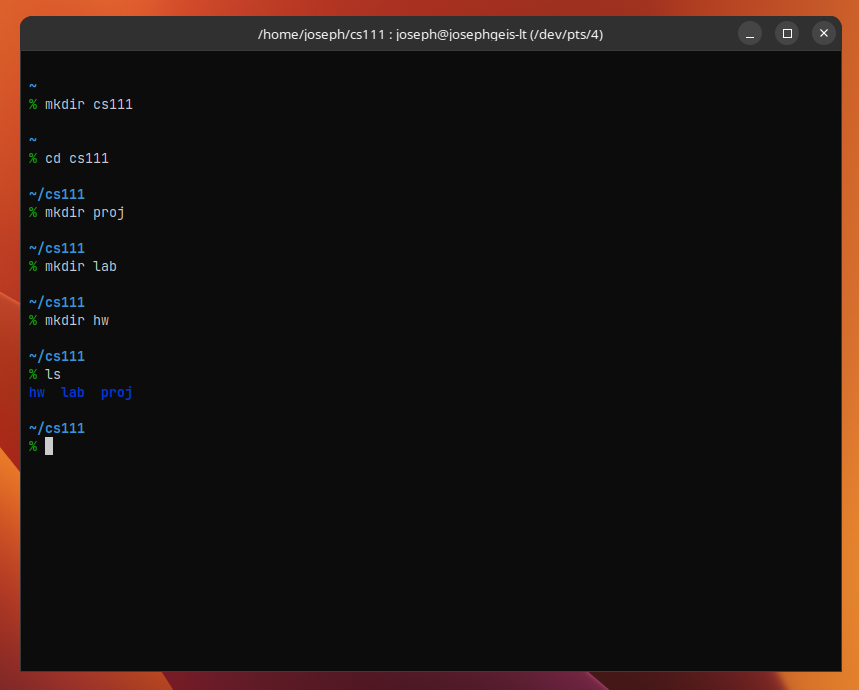
cd cs111Then, let's create folders called proj, lab, and hw inside of the cs111 folder:
cd ~/Desktop/cs111
mkdir proj
mkdir lab
mkdir hw
Now we can list the contents of the directory (using ls), and we will see
two folders, proj, lab, and hw.
Downloading the Assignment
Download the zip archive,
lab01.zip, which contains all the files that you'll need
for this lab. Once you've done that, let's find the downloaded file. On
most computers, lab01.zip is probably located in a directory called
Downloads in your home directory. Use the ls command to check:
ls ~/DownloadsIf you don't see lab01.zip, ask for help on Discord or in office
hours. On some versions of Safari the file may get unzipped for you, in
which case you would just see a new directory named lab01.
Extracting starter files
You must expand or unzip the zip archive before you can work on the lab files. Different operating systems and different browsers have different ways of unzipping. If the instructions below don't work for you, you can search online or ask a TA.
You can use the terminal to unzip the zip file from the command line. First,
cdinto the directory that contains the zip file:cd ~/DownloadsIf you are not using PowerShell, you can run the
unzipcommand with the name of the zip file:unzip lab01.zipIf you are using PowerShell (in Windows), you can run:
Expand-Archive lab01.zipThis will unzip lab01.zip into the downloads folder
OR
Expand-Archive lab01.zip -DestinationPath -ForceWhere -DestinationPath will be the directory where the zip file will be unzipped and -Force is optional
You might also be able to extract files without using the terminal by double clicking (or right-clicking) them in your OS's file explorer.
Once you unzip lab01.zip, you'll have a new folder called lab01
which contains the following files (check it out with cd and ls):
lab01.py: The template file you'll be adding your code to
In future labs, there will also often be a test_labNN.py file where NN is the lab number. These files will contain the tests that the autograder will run on you code so you can test it in advance to make sure it's working correctly.
Moving Files
If you lab01 folder is still in your downloads folder,
move the lab01 folder to the lab folder you created earlier:
mv ~/Downloads/lab01 ~/Desktop/cs111/labThe mv command will move the ~/Downloads/lab01 folder into
the ~/Desktop/cs111/lab folder.
Now, go to the lab01 folder that you just moved. Try using cd to
navigate your own way! If you get stuck, you can use the following
command:
cd ~/Desktop/cs111/lab/lab01Python Basics
Expressions and statements
Programs are made up of expressions and statements. An expression is a piece of code that evaluates to some value and a statement is one or more lines of code that make something happen in a program.
When you enter a Python expression into the interactive Python interpreter, its value will be displayed. As you read through the following examples, try out some similar expressions on your own Python interpreter, which you can start up by typing this in your terminal:
python3Remember, if you are using Windows and the
python3command doesn't work, try usingpythonorpy. See the install Python 3 section for more info and ask for help if you get stuck!
You'll be learning various types of expressions and statements in this course. For now, let's take a look at the ones you'll need to complete this lab.
Primitive expressions
Primitive expressions only take one step to evaluate. These include numbers and booleans, which just evaluate to themselves.
>>> 3
3
>>> 12.5
12.5
>>> True
True
Arithmetic expressions
Numbers may be combined with mathematical operators to form compound
expressions. In addition to the + operator (addition), the -
operator (subtraction), the * operator (multiplication) and the **
operator (exponentiation), there are three division-like operators to
remember:
- Floating point division (
/): divides the first number number by the second, evaluating to a number with a decimal point even if the numbers divide evenly. - Floor division (
//): divides the first number by the second and then rounds down, evaluating to an integer. - Modulo (
%): evaluates to the positive remainder left over from division.
Parentheses may be used to group subexpressions together; the entire expression is evaluated in PEMDAS (Parentheses, Exponentiation, Multiplication / Division, Addition / Subtraction) order.
>>> 7 / 4
1.75
>>> (2 + 6) / 4
2.0
>>> 7 // 4        # Floor division (rounding down)
1
>>> 7 % 4         # Modulus (remainder of 7 // 4)
3
Assignment statements
An assignment statement consists of a name and an expression. It changes
the state of the program by evaluating the expression to the right of
the = sign and binding its value to the name on the left.
>>> a = (100 + 50) // 2Now, if we evaluate a, the interpreter will display the value 75.
>>> a
75
Doing your assignments
Understanding problems
Another component of lab assignments is writing functions. We are going to open up lab01.py
found in the lab01 folder you downloaded earlier in your IDE.
To do this, open up your IDE, and there is likely a File tab near the top-left of the window or Open somewhere in the window.
Select File, then select Open or Open Folder (or something similar). Likely another window opening showing all
of your files and folders from your home directory. Navigate to your cs111/labs/lab01 folder
and select the lab01 folder and click Select Folder or OK (or something similar). Likely in your IDE, there
is some sort of file explorer shown near the left. Within that file explorer, you should see lab01.py. Click
on lab01.py until you see the function down below:
You can also type open . on MacOS or start . on
Windows to open the current directory in your Finder/File Explorer. Then
double click or right click to open the file in your IDE. You
should see something like this:
def eighteen_seventy_five():
    """Come up with the most creative expression that evaluates to 1875,
    using only numbers and the +, *, and - operators.

    >>> eighteen_seventy_five()
    1875
    """
    return ______
The lines in the triple-quotes """ are called a docstring, which
is a description of what the function is supposed to do. When writing
code in CS 111, you should always read the docstring!
The lines that begin with >>> are called doctests. Recall that
when using the Python interpreter, you write Python expressions next to
>>> and the output is printed below that line. Doctests explain what
the function does by showing actual Python code. It answers the
question: "If we input this Python code, what should the expected output
be?"
In eighteen_seventy_five,
- The docstring tells you to "come up with the most creative
expression that evaluates to 1875," but that you can only use
numbers and arithmetic operators
+(add),*(multiply), and-(subtract). - The doctest checks that the function call
eighteen_seventy_five()should return the number 1875.
You should not modify the docstring, unless you want to add your own tests! The only part of your assignments that you'll need to edit is the code unless otherwise specified.
Writing code
Once you understand what the question is asking, you're ready to start
writing code! You should replace the underscores in return ______ with
an expression that evaluates to 1875. What's the most creative
expression you can come up with?
Don't forget to save your assignment after you edit it! In most text editors, you can save by navigating to File > Save or by pressing Command-S on macOS or Ctrl-S on Windows.
Running tests
In CS 111, we will use two different methods to check your code. Most labs will have doctests. You can run those by typing:
python3 -m doctest lab01.pyThe second method, used in future labs, is to run the test file we provided you. To do this, you'll first have to make sure the byu-pytest-utils module is installed:
pip3 install byu_pytest_utilspython3 -m pip install byu_pytest_utils(You may only use pip or py. If you get an error, try something similar to this.)
You only have to do that once in the semester.
Then, to run the tests for an assignment, go to its folder and run the following command:
python3 -m pytest -vv .You don't have test files for lab 1, but you'll see this pattern in future labs, homeworks, and projects.
Back to the terminal—make sure you are in the lab01 directory we
created earlier (remember, the cd command lets you change
directories).
In that directory, you can type ls to verify that you are in the right place, you should see the following file:
lab01.py: the starter file you just edited
Now, let's test our code to make sure it works. Run this command:
python3 -m doctest lab01.pyRemember, if you are using Windows and the
python3command doesn't work, try using justpythonorpy. See the the install Python 3 section for more info and ask for help if you get stuck!
If you wrote your code correctly the doctests won't print anything. This is what you want. If your tests fail, you'll see a message something like this:
**********************************************************************
File "C:\Users\dagor\PycharmProjects\demo\lab01.py", line 5, in
lab01.eighteen_seventy_five
Failed example:
    eighteen_seventy_five()
Expected:
    1875
Got:
    1874
**********************************************************************
1 items had failures:
   1 of   1 in lab01.eighteen_seventy_five
***Test Failed*** 1 failures.
If your coded didn't work the first time, fix your code in your text editor until the test passes. If it did work, change it so it deliberatly failes so you can see the results.
Appendix: Useful Python command line options
When running a Python file, you can use options on the command line to inspect your code further. Here are a few that will come in handy. If you want to learn more about other Python command-line options, take a look at the documentation.
-
Using no command-line options will run the code in the file you provide and return you to the command line. For example, if we want to run
lab01.pythis way, we would write in the terminal:python3 lab01.py -
-i: The-ioption runs your Python script, then opens an interactive session. In an interactive session, you run Python code line by line and get immediate feedback instead of running an entire file all at once. To exit, typeexit()into the interpreter prompt. You can also use the keyboard shortcutCtrl-Don Linux/Mac machines orCtrl-Z Enteron Windows.If you edit the Python file while running it interactively, you will need to exit and restart the interpreter in order for those changes to take effect.
Here's how we can run
lab01.pyinteractively:python3 -i lab01.py -
-m doctest: Runs doctests in a particular file. Doctests are surrounded by triple quotes (""") within functions.Each test in the file consists of
>>>followed by some Python code and the expected output (though the>>>are not seen in the output of the doctest command).To run doctests for
lab01.py, we can run:python3 -m doctest lab01.py