Lab 05 - Picture Puzzles & Filters
Due by 11:59pm on 2024-01-25.
Starter Files
Download lab05.zip. Inside the archive, you will find starter files for the questions in this lab.
Download the zip file, unzip it, and move it to your cs111/labs folder. You should find within it:
- test_files/copper.png
- test_files/iron.png
- test_files/west.png
- test_files/cougar.png
- lab05.py
- test_lab05.py
Topics
Installing the BYU Image Library
To start coding with images, install BYU's image library by either typing one of the following commands into the terminal. If one does not work try the other option.
pip install byuimagepython3 -m pip install byuimageTo uninstall a library at any time, type into the terminal
pip uninstall <library_name>orpython3 -m pip uninstall <library_name>
Note: In some cases, instead of pip you may need to try pip3 or use python or py to run your code;
use your respective version when installing libraries (e.g. py -m pip install <library_name>
instead of the one given above). Then, when running your code, make sure to use the same version that you installed
the library with.
To check if you installed the library correctly, open up the python interpreter by typing python3, python, or py
(whichever works for you), and type from byuimage import Image into the interpreter. If nothing errors, you installed
the BYU image library correctly. If it errors, try the another installation option. If you installed the BYU image library,
properly it should look something like this:
PS C:\Users\isaih\cs\cs111\course-master\Labs\Lab05> python3
Python 3.10.11 (tags/v3.10.11:7d4cc5a, Apr  5 2023, 00:38:17) [MSC v.1929 64 bit (AMD64)] on win32
Type "help", "copyright", "credits" or "license" for more information.
>>> from byuimage import Image
>>> quit()
PS C:\Users\isaih\cs\cs111\course-master\Labs\Lab05>
In some cases, if you installed Python multiple times, there will be a problem between the Python version that your IDE (Pycharm, VS Code, etc.) and the Python version that the terminal uses, i.e., they will use different versions. Optionally, if you want to check if your IDE is working properly,, run lab05.py WITH from byuimage Import image at the top of the file using your IDE's run button. If you get an error, you can refer to Pycharm's or VS Code's guide for configuring a Python Interpreter:
Pycharm, VS Code (do not worry about the virtual environment section).
Image Review
Digital images consist of pixels. A pixel is a small square, showing a single color where each color can be controlled using a combination of red, green and blue (RGB). Each color ranges from a value of 0 (minimum) to 255 (maximum) and mix to form the color of the pixel.
Coding with Image
To code with images, you need to import or load the BYU image library for your program at the start/top of the file.
(Recall that a library is just some pre-written code). From that library you need to import specifically Image like so:
from byuimage import ImageImage takes in a string as an argument. This string should contain an image's filename or the path to the image's filename.
Image effectively grabs that image filename that we provided and turns it into an image we can work with in our code.
The following is an example on how you can go through each of the pixels in an image, modify each pixel, and show the result.
Demo the following code by copying and pasting it at the bottom of your lab05.py file:
cougar_image = Image("test_files/cougar.png")
#                      ^ path to `cougar.png` file
for pixel in cougar_image:
    pixel.red = 0
    pixel.green = 0

cougar_image.show()
Note: There is also a pixel.blue attribute.
After creating a new image, you can also access the image's height, width, and individual pixels by using the following:
<image>.height- returns image's height<image>.width- returns image's width<image>.get_pixel(x,y)- returns pixel at(x, y).xandyhave to be integers.
With these new tools, we are allowed a new way of going through each pixel in the image. For example:
cougar_image = Image("test_files/cougar.png")
for y in range(cougar_image.height):
    for x in range(cougar_image.width):
        pixel = cougar_image.get_pixel(x,y)
        # etc.
You can think of the first for loop as going through each row where y is a individual row index, and you can think of the second for loop as going through each column or slot in the row where x is a individual column or slot index
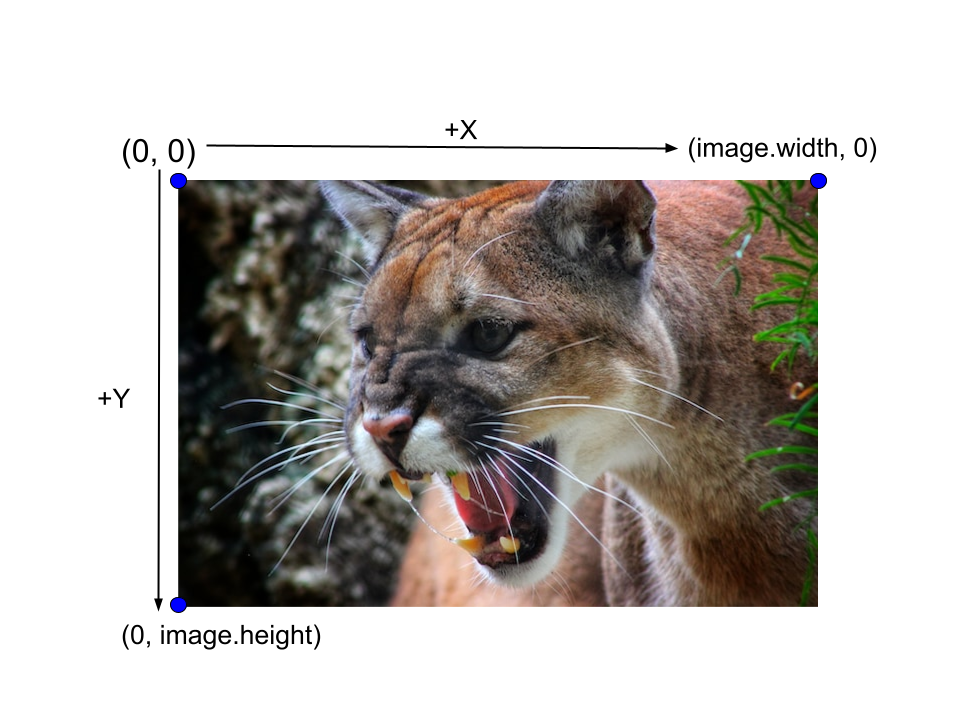
It is important to note that an image's origin (0, 0) starts in the upper left corner. Moving towards the right is the positive x direction, and moving downwards is the positive y direction.
Discuss:
- Why would we use double
forloops instead of thefor pixel in imagemethod? - What difference does it make if you switch the first
forloop (for y in ...) with the secondforloop (for x in ...)? How does it change the traversal of the image?
Creating New Images
To create a white blank image with certain dimensions, you can use Image.blank(<width>, <height>)
where width and height are integers. Image.blank returns a completely white image
with the specified dimensions where each pixels' RGB values are set to 255.
For example,
image = Image.blank(100, 50) # 100 pixels wide, 50 pixels high
image.show()
Required Questions
Q1: Iron Puzzle
Note: TA's should demonstrate how to solve this problem.
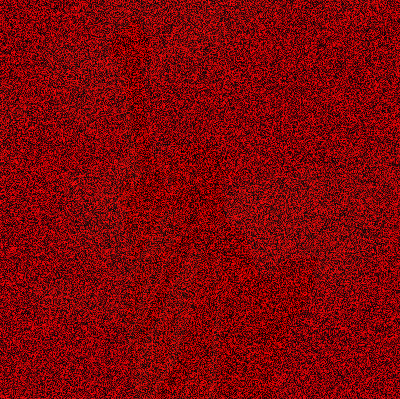
This is the iron.png file in the zip file you downloaded:
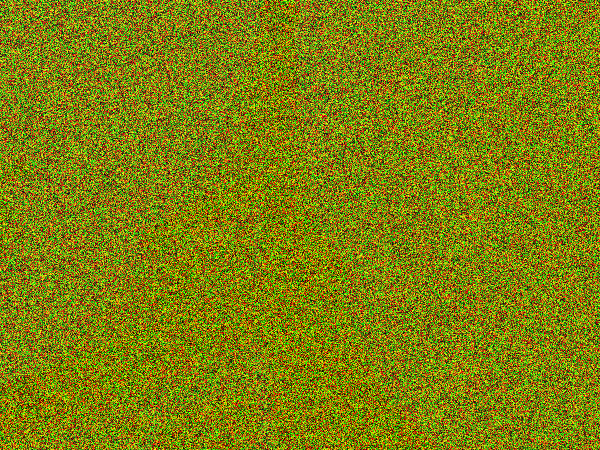
This picture contains an image of something famous; however, the image has been distorted. The famous object is all in blue values, but the blue values have all been divided by 10, so they are too small by a factor of 10. The red and green values are all just meaningless random values (“noise”) added to obscure the real image. You must undo these distortions to reveal the real image.
All your code will be in a function called iron_puzzle(filename). It takes one parameter,
the filename of the image with the puzzle in it. It should return the edited iron.png image with
the distortions undone. Your code should be able to show the modified image with code like this:
def iron_puzzle(filename):
    # load the image, solve the puzzle by modifying the image, return the modified image


solution_image = iron_puzzle("test_files/iron.png")
solution_image.show()
Try it!
Test your code:
python3 -m pytest test_lab05.py::test_iron_puzzlepytest test_lab05.py::test_iron_puzzleNote: You must install byu_pytest_utils in order to use the tests given above.
Hint: You will need to loop over all pixels in the image. First, set all the red and green values to 0 to get them out of the way. Look at the result. If you look very carefully, you may see the real image, although it is very very dark (way down towards 0). Now multiply each blue value by 10 scaling it back up to approximately its proper value.
Q2: West Puzzle
The hidden image is exclusively in the blue values, so set all pixels' red and green values to 0.
The hidden image is encoded using only the blue values that are less than 16 (that is, 0 through 15).
If a blue value is less than 16, multiply it by 16 to scale it up to its proper value.
Alternately if a blue value for any pixel is 16 or more, it is random garbage and should
be ignored (interpreted as 0). The west_puzzle function should return the recovered image.
Write a function called west_puzzle that has one parameter filename to recover the hidden image.
Try using two for loops when traversing over each of the pixels.
After commenting out or removing the call to the iron_puzzle function, you should be able to run your
west_puzzle with these lines of code:
solution = west_puzzle("test_files/west.png")
solution.show()
Try it when you are finished!
Test your code:
python3 -m pytest test_lab05.py::test_west_puzzlepytest test_lab05.py::test_west_puzzleQ3: Darken Image
Note: The following functions will be used as part of Project 1 so it is in your interest to get them completed in lab so you don't have to finish them on your own.
For this problem, write a function that can darken an image an arbitrary amount. The function definition should be:
def darken(filename, percent):The filename parameter contains the image's filename to darken, and the percent parameter
tells you how much to darken the image by. percent must and will be a number between 0 and 1.
The closer percent is to 1, the darker the image should be. darken should return the modified image.
Notice that we can darken a pixel 80% by leaving it 20% as bright. We can do this by
multiplying each pixels' RGB values by 0.2:
pixel.red = pixel.red * 0.2
pixel.green = pixel.green * 0.2
pixel.blue = pixel.blue * 0.2
This effectively leaves a pixel 20% as bright.
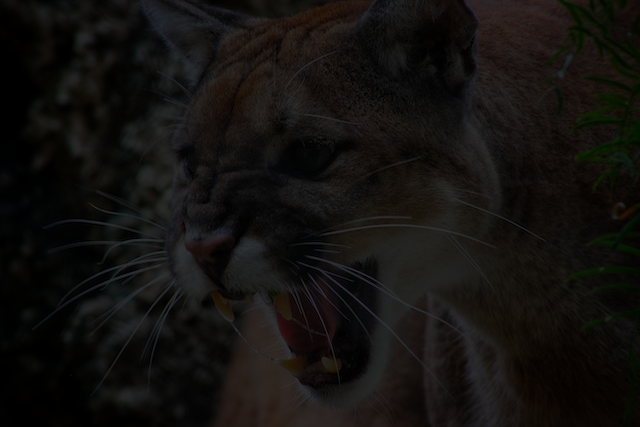
Doing so with the cougar.png image would result in an image that looks something like:
When you are done, try darkening with various parameters:
solution = darken("myImage.jpeg", 0.3)
solution.show()

darken("myImage.jpeg", 0.6).show()
# ^ This works exactly the same as the previous lines above. Why?
Test your code:
python3 -m pytest test_lab05.py::test_darkenpytest test_lab05.py::test_darkenYou can use cougar.png or download an image from Unsplash to use for this
problem and move it to your lab05 folder. Unsplash provides free pictures that are legal to use as you want.
You should always practice following copyright rules, so use a site like Unsplash instead of Google Images.
Skip over the premium images that are shown on Unsplash and use the free ones. Download the small version of images so your code will run faster since you will have fewer pixels to loop over.
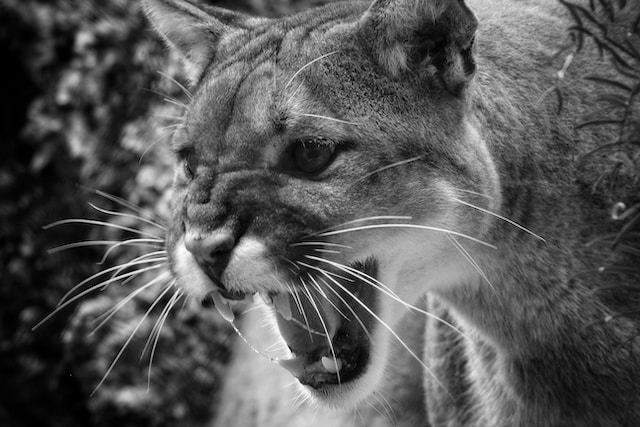
Q4: Grayscale Filter
For this problem, write a function called grayscale(filename) that takes the filename of an
image and returns a monochrome image (an image only in black, gray, and white).
Used on the Cougar.png image that would look something like this:
To make an image gray, we will use this algorithm:
- Loop through all of the pixels.
- For each pixel, calculate the average color:
average = (pixel.red + pixel.green + pixel.blue) / 3 - Set the pixel's red, green, and blue values equal to the average.
You should be able to call your function like this:
gray = grayscale("myImage.jpeg")
gray.show()
Try using grayscale with an image.
Test your code:
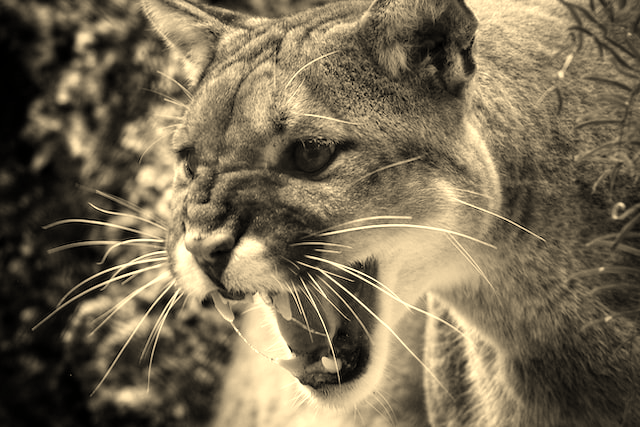
python3 -m pytest test_lab05.py::test_grayscalepytest test_lab05.py::test_grayscaleQ5: Sepia Filter
You have probably used a sepia filter for a photo before. Write a function called sepia(filename),
which takes a filename parameter and returns modified image that uses a sepia filter.
Used on the cougar.png image that would look something like this:
To apply the sepia filter, you will need to loop over all pixels, and then for each pixel, compute these values:
true_red = 0.393*pixel.red + 0.769*pixel.green + 0.189*pixel.blue
true_green = 0.349*pixel.red + 0.686*pixel.green + 0.168*pixel.blue
true_blue = 0.272*pixel.red + 0.534*pixel.green + 0.131*pixel.blue
Then, set each pixel color. For example:
pixel.red = true_redFinally, it may be the case that the color value is greater than 255. If that happens, set that pixel's color value to the maximum value of 255. For example:
if pixel.red > 255:
    pixel.red = 255
Run your function like previously:
solution = sepia("myImage.jpeg")
solution.show()
Test your code:
python3 -m pytest test_lab05.py::test_sepiapytest test_lab05.py::test_sepiaQ6: Left Border
Write a function called create_left_border(filename, weight) that adds a blue border
to the left of the image given the weight. For example, with cougar.png and weight = 25:
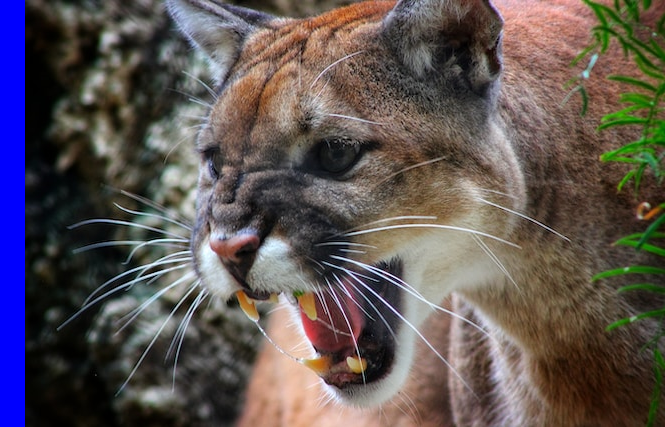
You should increase the image's width by weight pixels where the new area is blue.
The image's size should not decrease because of the border.
To do this you will have to
- Create a new larger image.
- Make the new area for the border blue.
- Do this by setting the pixel's green and red values to
0while setting the blue value to255. - You can either color the entire new image blue, then copy the old image onto the new image OR color only the new area blue. (The first approach is easier, but the second approach is significantly more efficient.)
- Do this by setting the pixel's green and red values to
- Copy the contents of the old image to the new image.
- Iterate over each pixel in the old image and find the correct pixel in the new image. Then copy the contents of one pixel to another.
Test your code:
python3 -m pytest test_lab05.py::test_create_left_borderpytest test_lab05.py::test_create_left_borderHints
- Use the double
forloop strategy of going through the pixels in the image mentioned above withget_pixel(x,y). Doing this will allow us to use both pixels from both images for copying.- To copy the contents of one pixel to another, we can do something like
new_pixel.red = original_pixel.redfor each of the colors wherenew_pixelwould be the pixel for the new larger image andoriginal_pixelwould be the pixel in the original image.- When finding the correct pixel to copy over the original image to the bordered image, the pixel will just be the original image's pixel's
xposition plus theweight.
Submit
Test your entire lab:
python3 -m pytest test_lab05.pypytest test_lab05.pyIf you attend the lab, you don't have to submit anything.
If you don't attend the lab, you will have to submit working code. Submit the lab05.py file on Canvas to Gradescope in the window on the assignment page.
Extra Practice
Q7: Stripes
Let's bring everything together. Write a function called create_stripes(filename) that takes in an image file. You should:
- Create a new blank image with the same dimensions as the image given in
filename, but the width is an extra50pixels and the height is an extra25pixels. - With the following priority:
- Make the pixel green if it is on a even row
- Make the pixel blue if it on a odd column (or slot)
- Otherwise, make the pixel red
- Return the newly edited image
Your image should look something like this (perhaps after you zoom in several times)
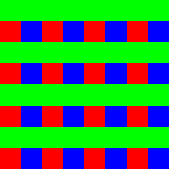
Keep in mind that we start counting x and y at 0, so despite the fact that to us the first row is green, it is technically the 0th row which is why we made it green. (Same scenario with the columns/slots.)
Q8: Copper Puzzle
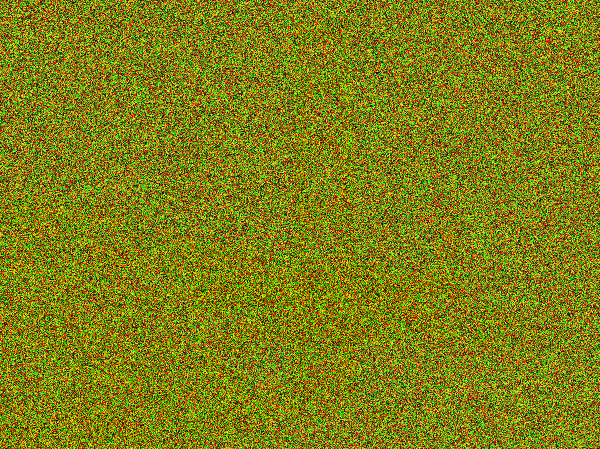
The copper puzzle is another image puzzle. Use the copper.png file that is in the zip file you downloaded. It too has been distorted:
Write a function called copper_puzzle(filename) to recover the hidden image.
The hidden image is in the blue and green values; however, all the blue and green values have all been divided by 20, so the values are very small. The red values are all just random numbers, noise added on top to obscure things. Undo these distortions to reveal the true image.
You should be able to run your code with:
solution = copper_puzzle("test_files/copper.png")
solution.show()
What is the hidden image?
What happens if you fix only the green values or only the blue values?