Project 1 - Image Processor
Objectives
- Practice the use of command line arguments
- Practice the use of higher order functions
- Gain experience in the use of external libraries
- Gain experience in the use of arrays/lists for data storage
- Gain experience in abstraction, decomposition, & generalization
- Gain experience building a full program from scratch
Introduction
In this day and age, almost everyone is carrying a camera in their pocket. But the pictures aren't always what we want them to be and sometimes need a little bit of a touch up or need to be manipulated in some way.
In this project you are going to write a small program that will take input from the user on the command line and manipulate one or more images based on the provided input. You'll be utilizing all the functions you wrote in Lab 5 and Homework 2 as well as adding in a few new features.
Starter Files
To get the starter files for this project, download proj1.zip. This includes
sample images and pytests as well as a blank image_processing.py file where you will write
your code for this project.
Part 1 - Receiving Commands
In this first part of the project, we'll set up our program to be able to receive and parse command line arguments from the user. We will be adding to the commands the program can handle as we go along.
Task 1 - Create the initial program (5 pts)
To start, add the following lines to your image_processing.py file:
if __name__ == "__main__":
   pass
This sets up a "main" portion of the program that is executed when the script is run.
You should write all of your functions above this line. Any code you want to run at the
start of program execution should go in place of the pass statement. If you want, you
can just have a call to a main() function like we did in homework 1 or you can put the
main execution code here. The design is up to you.
Task 2 - Validating command line arguments (15 pts)
As we work through the project, the program is going to read the command line arguments and execute the proper function based on the arguments provided. The first step is to read in the command line arguments provided by the user and make sure they are valid. Valid command line arguments will always be of the form:
python image_processing.py <operation flag> [<argument 1> <argument 2> ...]where the operation flag will be a string that starts with a - (such as '-d') and will be followed by one or more argument values needed to perform that operation. We'll start by implementing the display operation which has the form:
-d <image file>This operation will simply display the file specified by the <image file> command line argument. To validate our command line options, let's create a validate_commands() function that takes a list of arguments as input and returns True or False depending on if that list contains a valid set of commands and arguments. The list passed to this function should have the operation as the first element and the arguments as the rest of the elements in the list.
For the display operation, we should check that the first element in the list is -d and that there is a second element. If so, the function should return True, otherwise it should return False.
Note: it is up to you if you want to return false if there are extra arguments after the necessary ones. You can treat this as an error or you can just ignore extra elements.
Once you have validate_commands() working, call it from the main part of your program and have it print out a message stating whether or not the command line arguments are valid or not. Then try running your program with different arguments or write some doctests to verify that it is working.
We'll be revisiting this function often to add more valid command checks.
Task 3 - Display the image (5 pts)
The final step is to actually execute the operation provided by the command line arguments. In this case, we are just displaying the image. Add code to your program to read in the image file (creating a new Image) and then display it for the user to see.
At this point in the code, you should be able execute your program with the following command line arguments and see an image displayed:
python3 image_processing.py -d test_files/beach1.input.jpg
Test your code:
python3 -m pytest test_project1.py::test_display_imageor
pytest test_project1.py::test_display_imagePart 2 - Adding in some filters
In this part of the project you will add the functionality to your program to apply the darkening, sepia, and grayscale filters you build in Lab 5. For each of these filters, you will need to update the code that checks the valid command line options and then write code to call the filter and write the output file. You may also need to modify your original filter functions slightly.
Task 1 - Darken Filter (5 points)
The command line arguments to call the darken filter look like this:
-k <input file> <output file> <percent> We will use -k for darken since we are using -d for display. The
percent is a float value between 0 and 1.
Update your validate_commands() method to accept -k as a valid command as
long as it has 3 more arguments after it. You could also check that the
third argument after the -k (the percentage) is a float if you want.
Once you've updated validate_commands(), add in the code for the darken()
function you wrote in Lab 5, have the code call your darken() function with
the provided filename and percentage, and then write the updated image to the output file.
To save images, we can use the Image objects .save() method. It takes as its argument the filename you want to save the image as, which is just the <output file> passed in as a command line parameter. e.g.
myImage.save(output_file)Important: Make sure the output filename ends in .png. Not doing so may cause the autograder to fail when your code is right.
If you run the following code, it should darken test_files/beach2.input.jpg by 50% and save it into a file called output.png in the same directory as your image_processing.py:
python3 image_processing.py -k test_files/beach2.input.jpg output.png 0.5Test your code:
python3 -m pytest test_project1.py::test_darken_filteror
pytest test_project1.py::test_darken_filterTask 2 - Sepia (5 points)
Now you should add in the ability to call the sepia filter. The command for the sepia filter is:
-s <input file> <output file>Just like for the darkening filter, update your validate_commands() function
and, write the code to call the sepia() function (that you can just copy
from your code in Lab 5), and then save the output image.
Test your code:
python3 -m pytest test_project1.py::test_sepia_filteror
pytest test_project1.py::test_sepia_filterTask 3 - Grayscale (5 points)
Finally, add in the functionality to apply the grayscale filter to an image. The command for this has the form:
-g <input file> <output file>Again, update validate_commands() and then call your grayscale() function from Lab 5 and write the updated image to the output file.
Test your code:
python3 -m pytest test_project1.py::test_grayscale_filteror
pytest test_project1.py::test_grayscale_filterTask 4 - Refactoring - Thinking about your design
You now have a program that does four different image manipulations. Look at the code for each one. Do you see any repeated code that is doing exactly the same work? You might consider pulling that code into a function of its own and having the other functions call your new one. For example, are you reading in the image file in every function? Consider making a load_image() function that takes a filename as a parameter, loads the file and returns the Image object that is created. Are you doing the same set of operations but just calling a different function? Consider putting that code into a function with the called function passed in as a parameter.
Part 3 - Image manipulations
In this part of the project, you will add in more commands to apply borders
to an image, flip it vertically, and mirror it horizontally. The first two
will just be applying functions you wrote in Homework 2,
but the last will be writing new code (that is very similar to your flipped()
function).
Task 1 - Borders (5 points)
For this task, you'll use the make_borders() method you wrote in Homework 2 to
do the work. The command for this operation looks like this:
-b <input file> <output file> <thickness> <red> <green> <blue>where <thickness> is the size of the bar in pixels, and <red> <green> and <blue> are the values to use to define the color of the bar.
Again, update your validate_commands() function to accept this new operation and then using the make_borders() function create a new version of the input image framed by the border and save it to the output file. You may want to use modified versions of some of the other functions we wrote in class as well.
Test your code:
python3 -m pytest test_project1.py::test_border_filteror
pytest test_project1.py::test_border_filterTask 2 - Flipping an image (5 points)
In this part, you'll add code to allow you to call your flipped() function from Homework 2 to flip an image vertically (top to bottom). The command for this operation is:
-f <input file> <output file>Like before, update validate_commands() and then call your flipped() function to flip the image and then save it to the output file.
Test your code:
python3 -m pytest test_project1.py::test_flip_filteror
pytest test_project1.py::test_flip_filterTask 3 - Mirroring an image (15 points)
So far you've just been adding in code to call functions you've already written. In this part of the Project and beyond, you'll also be writing the code that does the work. The first new operation is to mirror an image (left to right). This is very similar to your flipped() function. It would take an image that looks like this:
and make it look like this:

The command line arguments for this task are:
-m <input file> <output file>Update your validate_commands() function to accept these arguments. The next step is to write a mirror() function that takes an input filename and output filename, flips the input image horizontally, then saves it. Think about how your flipped() function works. This one is very similar but working on a different axes.
Test your code:
python3 -m pytest test_project1.py::test_mirror_filteror
pytest test_project1.py::test_mirror_filterTask 4 - Refactoring again
Again, look at your code. Do you have duplication anywhere? If you have duplication, go ahead and think about how you could remove the redundancy and update your code. You aren't required to, but it is always good to review and see where improvements can be made.
Part 4 - Compositing
In this part of the project you will add in the functionality to create a composite image out of multiple images, and use a green screen to overlay an image into a different image.
Task 1 - Collage (20 points)
For this task you will add code that can take four image of the same size and combine them into a single large image like this:
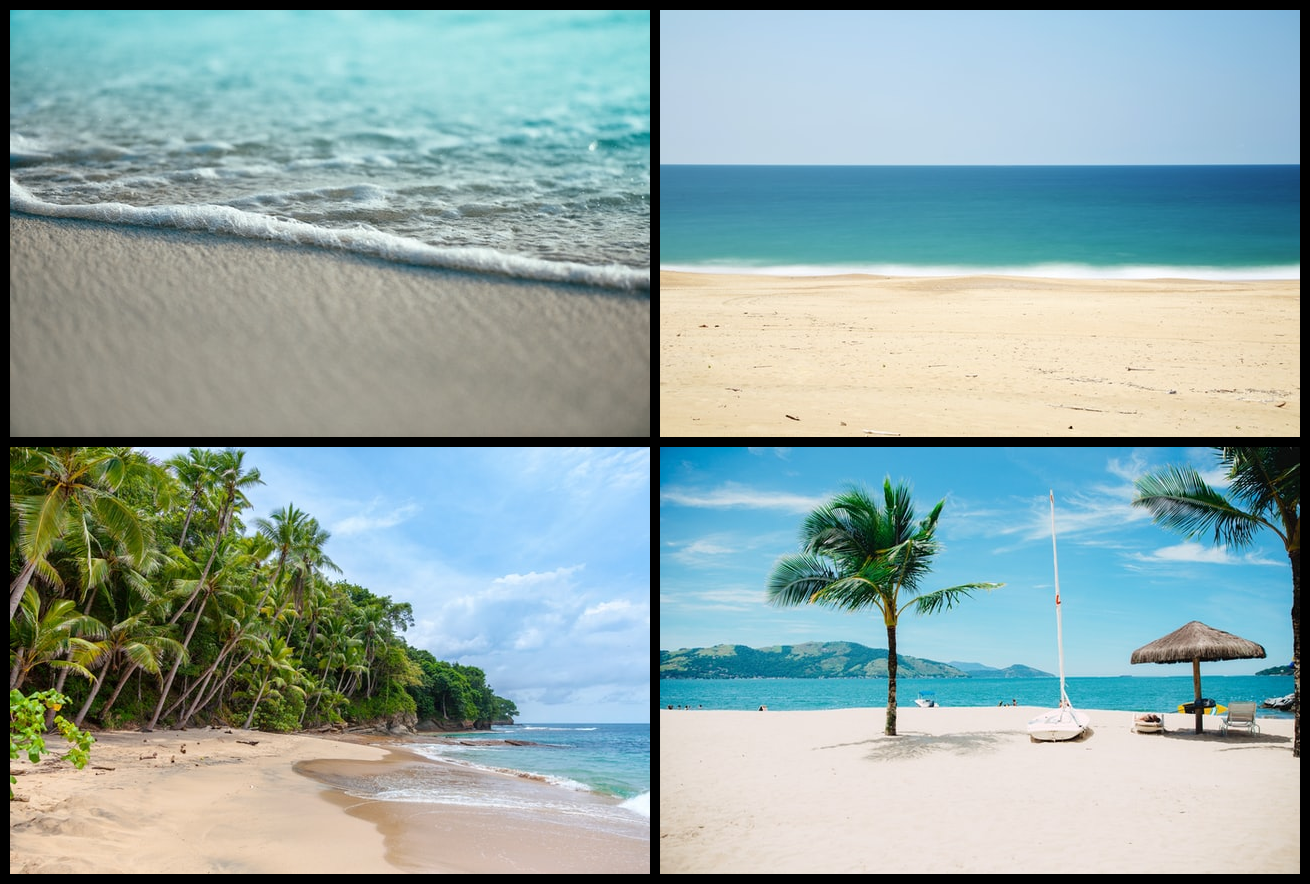
The user should be able to specify the size of the borders (which will be black for this project). The command line arguments for this action look like this:
-c <image 1> <image 2> <image 3> <image 4> <output image> <border thickness>Update your validate_commands() function and then write and call a function to generate the new image. The new image should have image 1 and image 2 on the top row with image 3 and image 4 on the bottom row like this:
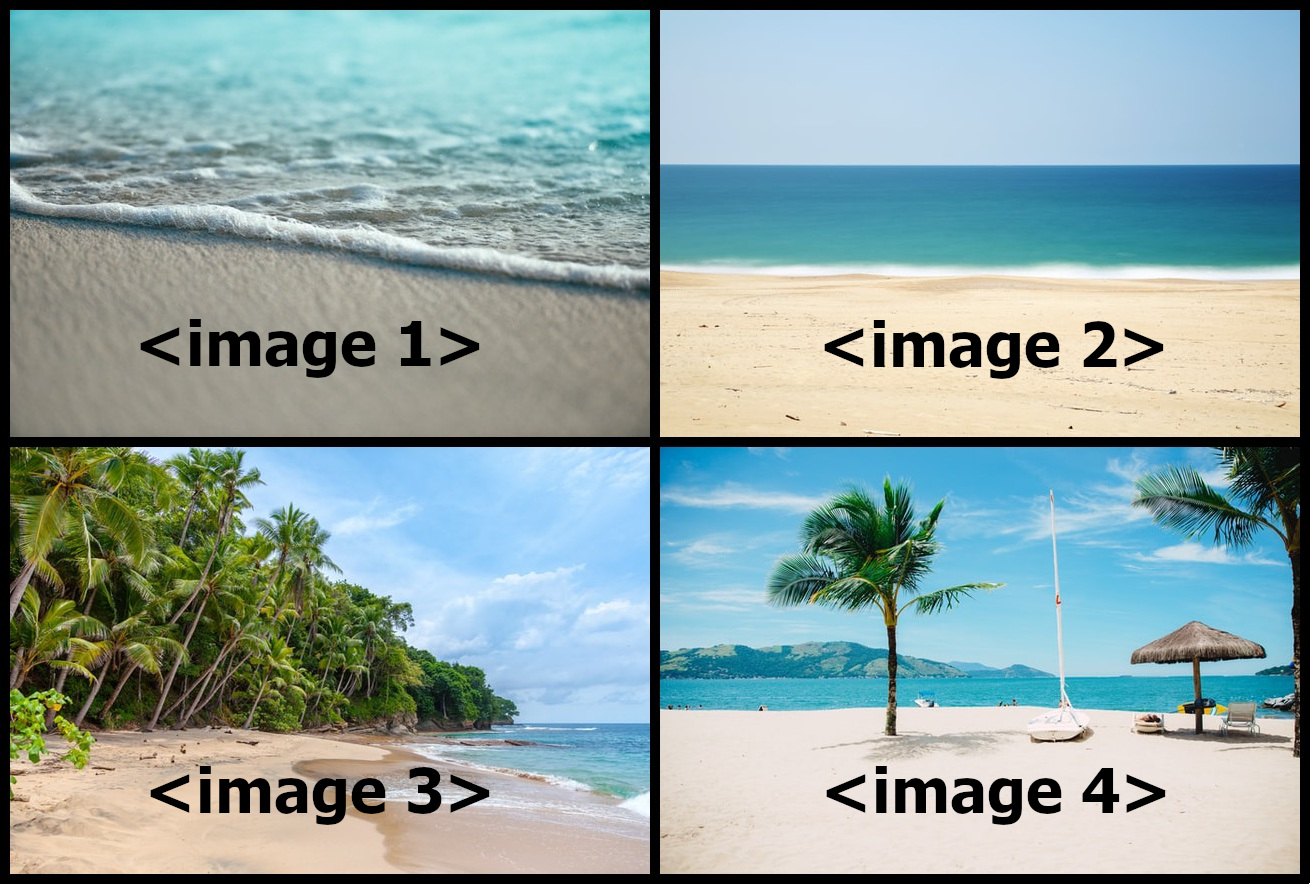
The final image should be written to the output filename provided.
Run your code:
python3 image_processing.py -c test_files/beach1.input.jpg test_files/beach2.input.jpg test_files/beach3.input.jpg test_files/beach4.input.jpg collage.png 50 Test your code:
python3 -m pytest test_project1.py::test_collage_filteror
pytest test_project1.py::test_collage_filterTask 2 - Green screen (20 points)
In this final portion of the project, you'll add the capability to your program to use a green screen to add part of a foreground image on to a background image.
You'll take two files like these:

and produce an image like

The command line arguments for this operation are:
-y <foreground image> <background image> <output file> <threshold> <factor>where the foreground image is the one with the green screen and the threshold and factors are parameters the user can pass that sets the level for what is considered as part of the green background as we discussed in class. For this project both input images will be the same size as we are not going to require you to handle different sized images.
First update your validate_commands() function to accept these parameters.
To make the green screen filter work, you'll need:
- a function to determine if a pixel is "green enough," i.e. above the threshold provided by the user to be ignored. We recommend that you use the
detect_green()function we wrote in class since that is what the autograder uses. - a function to copy the pixels of the foreground image onto the background image ignoring all pixels that considered green enough by the function in #1 above.
Note: the key file we gave you to test this function with was generated using a threshold of 90 and a factor of 1.3
Test your code:
python3 -m pytest test_project1.py::test_greenscreen_filteror
pytest test_project1.py::test_greenscreen_filterTask 3 - Final Refactor
Once again, look through your code for any duplication of functionality and if you find any, extract it into its own function and call that function from each place the functionality is needed. You may not find any, but you should always check.
Turn in your work
Congratulations, you've now created a small tool to allow you to do some basic processing on any images you might have.
You'll submit your image_processing.py file on Canvas via Gradescope where it
will be checked via the auto grader. We will be testing your program using both
the images we gave you to test with as well as other images! Make sure that you haven't
"hard coded" anything specific to the test images. We do not guarantee that all
scenarios are tested by the images that we have provided you.
Test your entire project:
python3 -m pytest test_project1.pyor
pytest test_project1.pyGoing Further
Now that you have the basic functionality of your program, if you want to extend what your program can do, here are some things you could try to add to the program to improve its functionality.
- If invalid command line arguments are provided, print out a message listing the possible commands and valid arguments
- Add a help command (-h) that takes no arguments and lists all the available commands
- Extend the collage functionality to allow the user to specify the color of the border
- Extend the collage functionality to handle images of different sizes
- Extend the collage functionality to allow the user to provide a different number of images and specify their positions
- Extend the green screen functionality to allow the user to specify the position of the copied foreground image relative to the background image.
- Handle any errors that might arise when the images passed to the green screen function aren't the same size
- Add functionality to just print the red, green, or blue channel of the image.
- Add some other functionality that you want to apply to your images